 |
 |
 |
This documentation is still a work in progress...
Using the Howard 8" EdgeHD HyperStar (SCO-HyperStar)
1. Before you go to SCO - Connectivity
There are 3 methods of connecting your PC/Mac/Tablet to control the telescope and camera. All will require being on the same WiFi network as the equipment (see below 2. At SCO). Please choose one of these.
- Install NoMachine (free remote desktop software https://www.nomachine.com/) on your own device and connect to the telescope to control it by using the KStars application on the RPi4 via NoMachine which is installed on the RPi4. This gives you a "Remote Desktop" view of the RPi4. With this approach you can transfer (the previously compressed folder of) captured images to your computer using the "Transfer a file" NoMachine menu item.
- Alternately connect to the telescope to control it via the KStars app (running on the RPi4) by connecting to it using your internet browser on your device using noVNC connectivity (https://novnc.com/info.html). You do not have to install anything on your own equipment. To connect via noVNC, connect to this address http://192.168.0.150:6080/vnc.html?host=192.168.0.150&port=6080 using your internet browser. The noVNC password is: astro. Control the telescope by using the KStars application on the RPi4. With this approach you can transfer your captured images to your computer by mounting your computer's shared network folder to the desktop.
- Finally you could install KStars locally on your device and create a KStars Device Profile to connect from your KStars app to the remote KStars (on the RPi4) and return the captured images directly to a folder on your device. KStars is available on a number of platforms https://kstars.kde.org/download/. This is the preferred approach, as you have immediate access to your captured images, and it provides an opportunity to explore KStars before visiting SCO using simulated equipment.
2. At SCO - Starting up the Telescope
Note that the sequence of starting devices is important. The Raspberry Pi needs to see the TP-Link Travel Router network is available so it won't create its own hotspot. In addition, it also uses the Celestron C8 mount to get the current date/time and location.
- Located on the Roll-off Observatory eastern wall, ensure the TP-Link Travel router labelled "SCO Router" is powered on.
- Uncover the C8 Telescope located near the back wall of the Roll-Off observatory and plug in the power bar to the power the equipment. This powers the C8 (it also has a power switch), the Atik 428ex camera, the focuser, and eventually the Raspberry Pi4. Avoid moving the tripod if possible.
- Attach the dew shield if there is any chance of dew.
- Ensure the Telescope is powered on. Using the Hand-Controller, press enter to follow the initialization prompts:
Ensure the Dec and RA motors are at their index positions.
Check/adjust the location and Date / Time as shown on the Hand-Controller.
Choose "Last Alignment" from the choices of Alignment options. (note - we still have to check whether last alignment is sufficient in this scenario). - Power on the Raspberry Pi4 computer attached to the telescope optical tube. It has a USB-C power connection and a USB-C power cable to power it.
- Using one of the methods above in part 1, connect your PC/Mac/Tablet to the telescope via the network SCO-TP-Link_42204787_5G or SCO-TP-Link_42204787. The password is 8 digit number sequence in the network name.
3. At SCO - Capturing images
- Once you are connected to the network, run either NoMachine or your browser to connect to the Telescope's computer.
- If using NoMachine, it will show you the available computers to connect to. Choose the SCO-HyperStar. Once connected you will see the remote desktop of the SCO-HyperStar. Double click on the KStars icon
 on the desktop to start the imaging session.
 - Within KStars, under the Tools menu, choose EKOS to launch the EKOS to allow you to select the correct equipment profile, in this case the predefined "SCO Celestron HyperStar" profile. Once selected, click the Start button
 . The profile will attempt to connect KStars to the devices in the profile: the Celestron C8, the MicroTouch Focuser, and the Atik A428 ex camera. The INDI Control Panel will appear showing the devices that have been connected: Atik CCD, MicroTouch Focuser and the Celestron AVX telescope mount.
 - Or alternately, If you have chosen to install KStars on your own equipment and communicate to the "remote" SCO-HyperStar computer, then there is an alternative step required to define the remote devices in your local profile. In the Setup tab, click on the Add profile button
 to create a profile with the device drivers from the available drivers and choose the Remote mode with the host ip address 192.168.0.101. Save the profile using the Name you specify (e.g. SCO SCO-HyperStar).
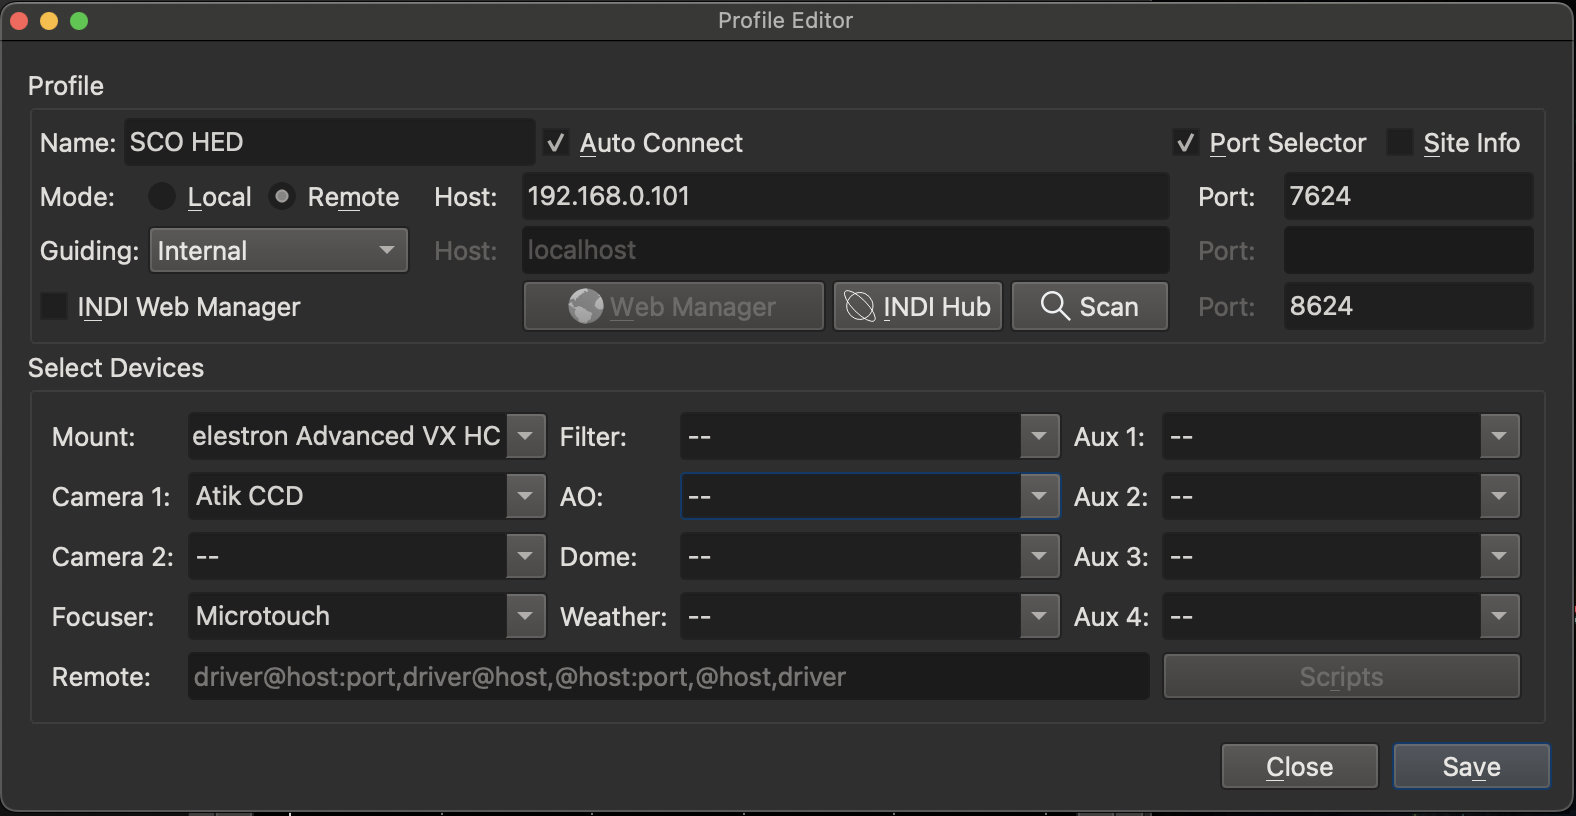
- When connected you will see a number of additional tabs appear in the KStars menus adding additional functionality now that the devices are connected

corrsponding to the Setup (default), Scheduler, Analyze, CCD, Focus, Mount, Align and Guide tabs. - On the assumption that the polar alignment of the SCO-HyperStar is acceptable between uses, the steps in imaging are: Find an object to image, align the scope to that target, focus the telescope, and take the images.
a. Use the Observation Planner menu item and choose Find Object or What's Up Tonight to select a target. Once the target is in the Wish List right click to Center the object in the sky view and Scope to move the telescope to that location.
b. After the telescope has moved to the target area, Choose the Align tab to Capture & Solve by Slew to the Target, to precisely center the target. It may take a few exposures and telescope repositions to center the target.
c. Choose the Focus tab to begin an Auto Focus sequence to zero in on the precise focus position. This requires you are relatively close to focus to begin with and the sky conditions provide sufficient stars to measure their HFR.
d. Choose the CCD tab to set the exposure time for each image (sec) and the Count of the number of images to take. If the target was successfully found during the alignment, the name of the Target should be already entered. The directory of where to store the images defaults to a folder on the RPi4. Click on the Add button to add this request to the image queue. When you've added the image requests you'd like to use to the queue, click on the run button to begin imaging.
4. When you are finished for the night
- Depending on how you connected to the Raspberry Pi and KStars, make sure you have a local copy of your images on your own machine. Using the KStars <--> KStars connections you likely have already saved the images to your own computer. If using NoMachine, compress the folder of images on the RPi4 to a single file and using the transfer from server option in NoMachine, copy the compressed file back to your computer. Using noVNC - TBD.
- Ensure the Telescope moved to the Home Position, preferrably using the Park button in the Scope menu of KStars, or using the AVX mount Go to Home Position (under utilities in the Hand Controller).
- Power off the Raspberry Pi4 computer attached to the telescope optical tube. It has a USB-C power connection and a USB-C power cable to power it. Unplug that cable.
- Remove the dew shield and cover the C8 Telescope. Avoid moving the tripod if possible.
- Follow the SCO guidelines for leaving SCO in a secure state.
Things you might want
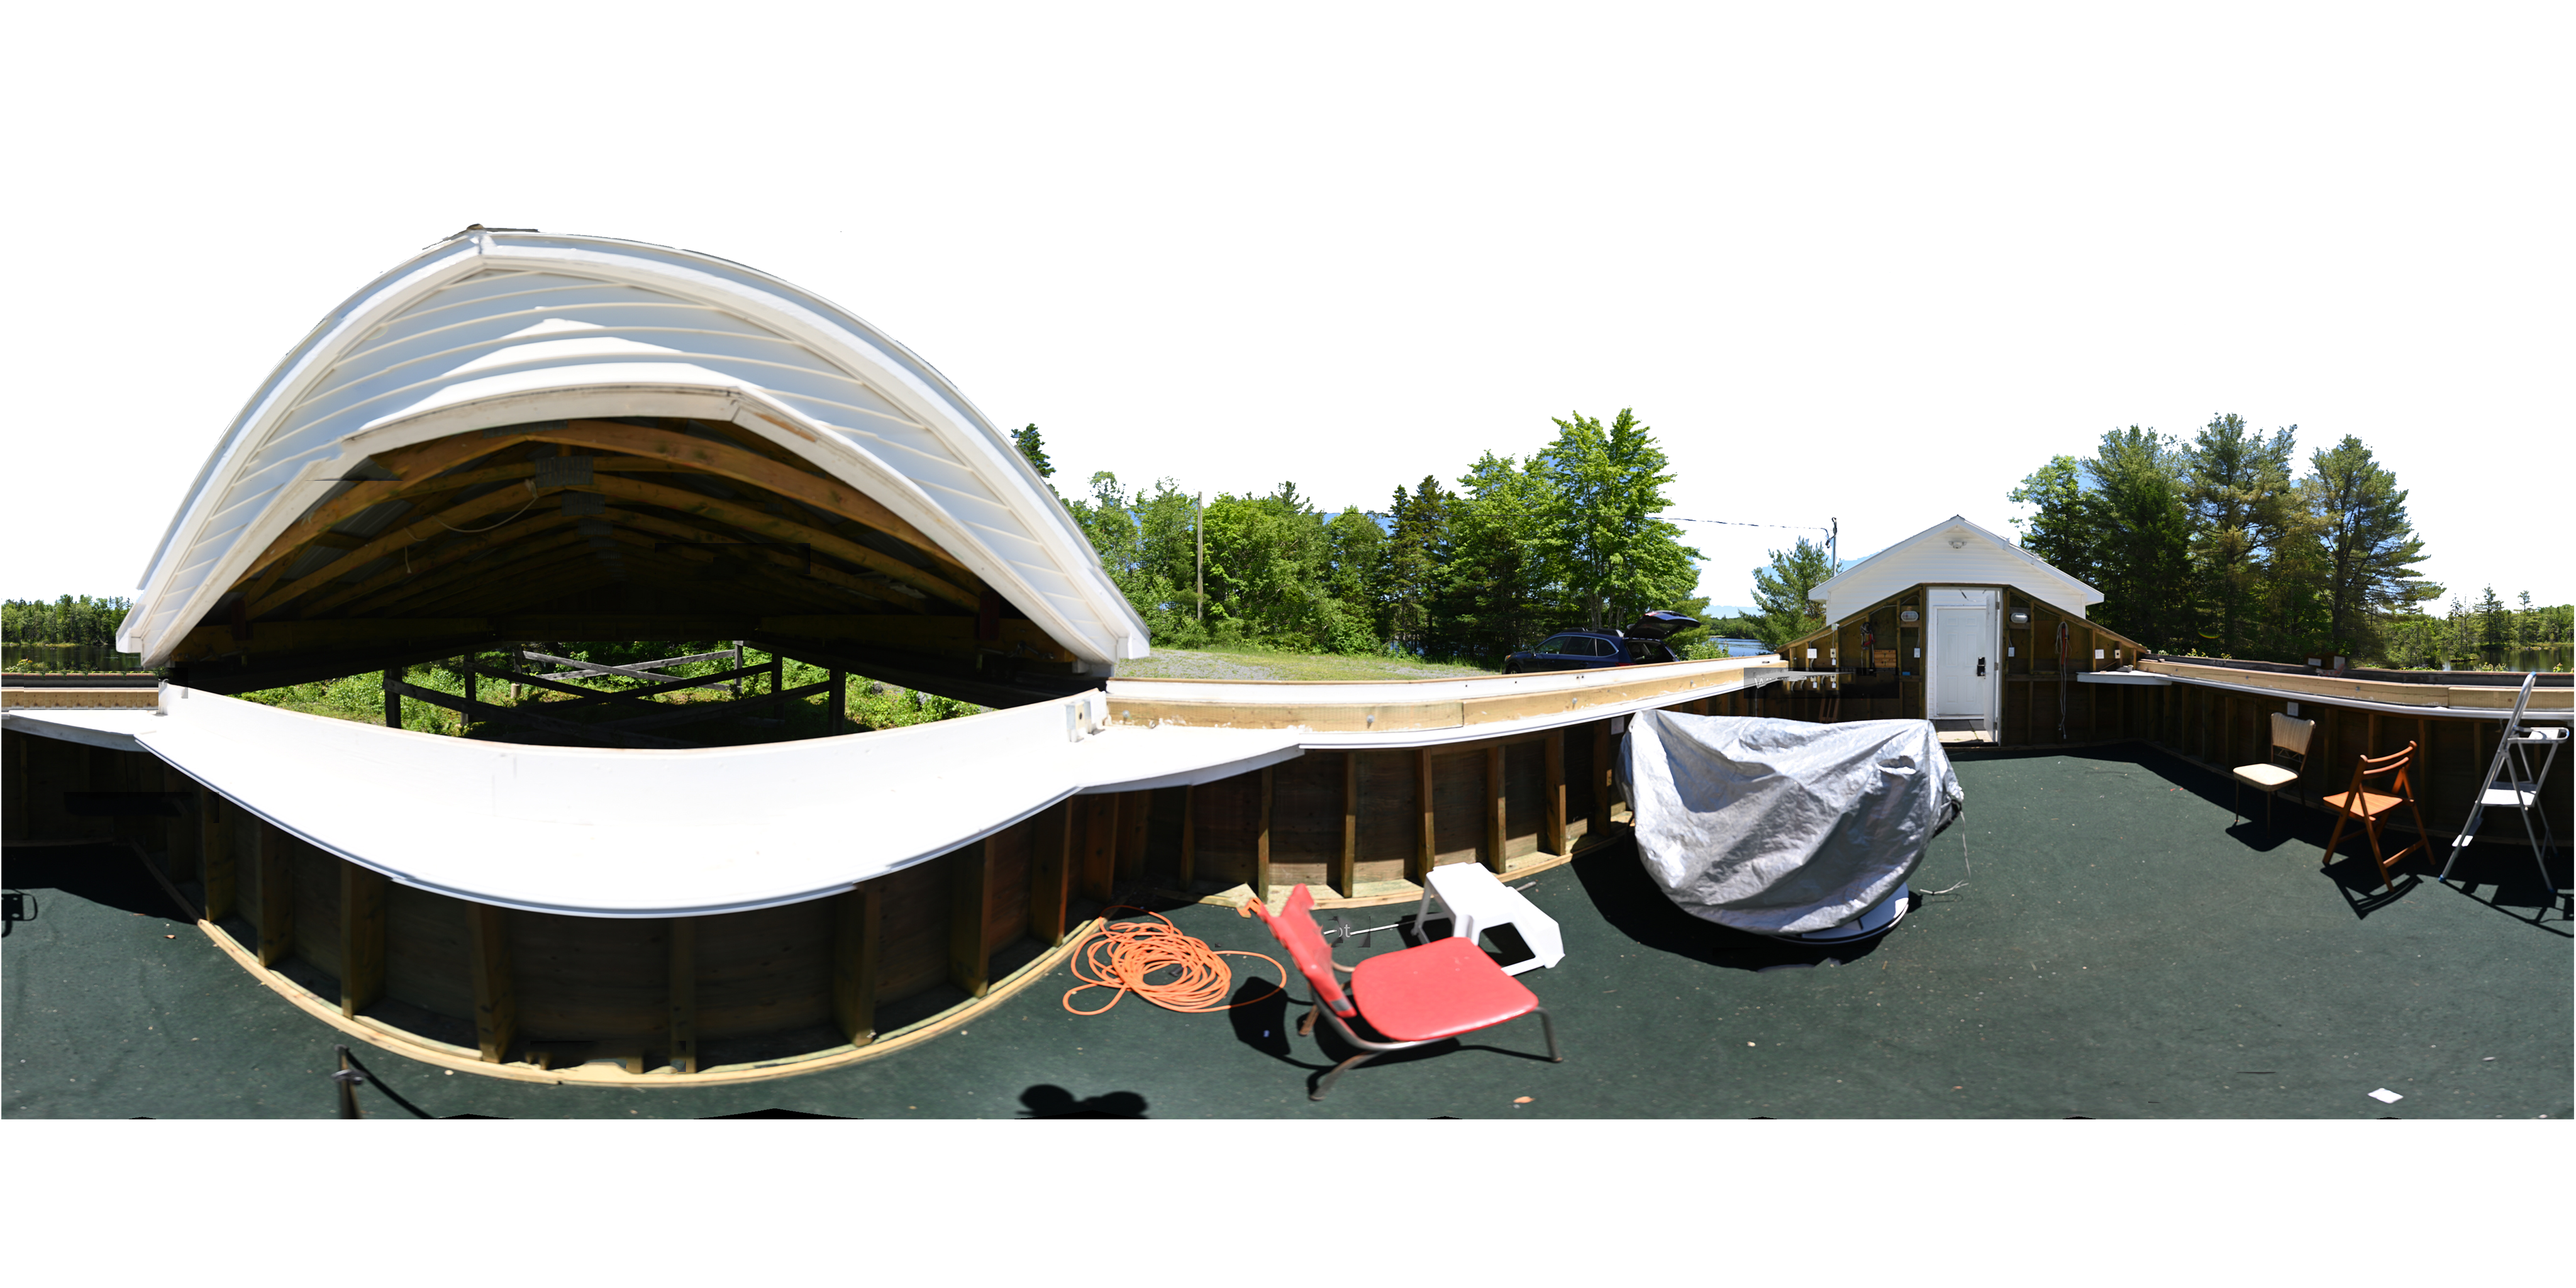
A terrain image showing the roll-off and tree skyline at SCO from the position of the SCO-HyperStar. This file can be added to your local KStars installation as a terrain image with an azimuth correction of -180˚.
The To Do list
Check the collimation of the HyperStar. Check by focusing on a bright star and then defocus so that a doughnut shape is visible. Make sure the doughnut's center is centered in the doughnut. The process for HyperStar collimation is at https://www.cloudynights.com/articles/cat/articles/the-amazing-hyperstar-a-guide-to-optimize-perf-r3013.
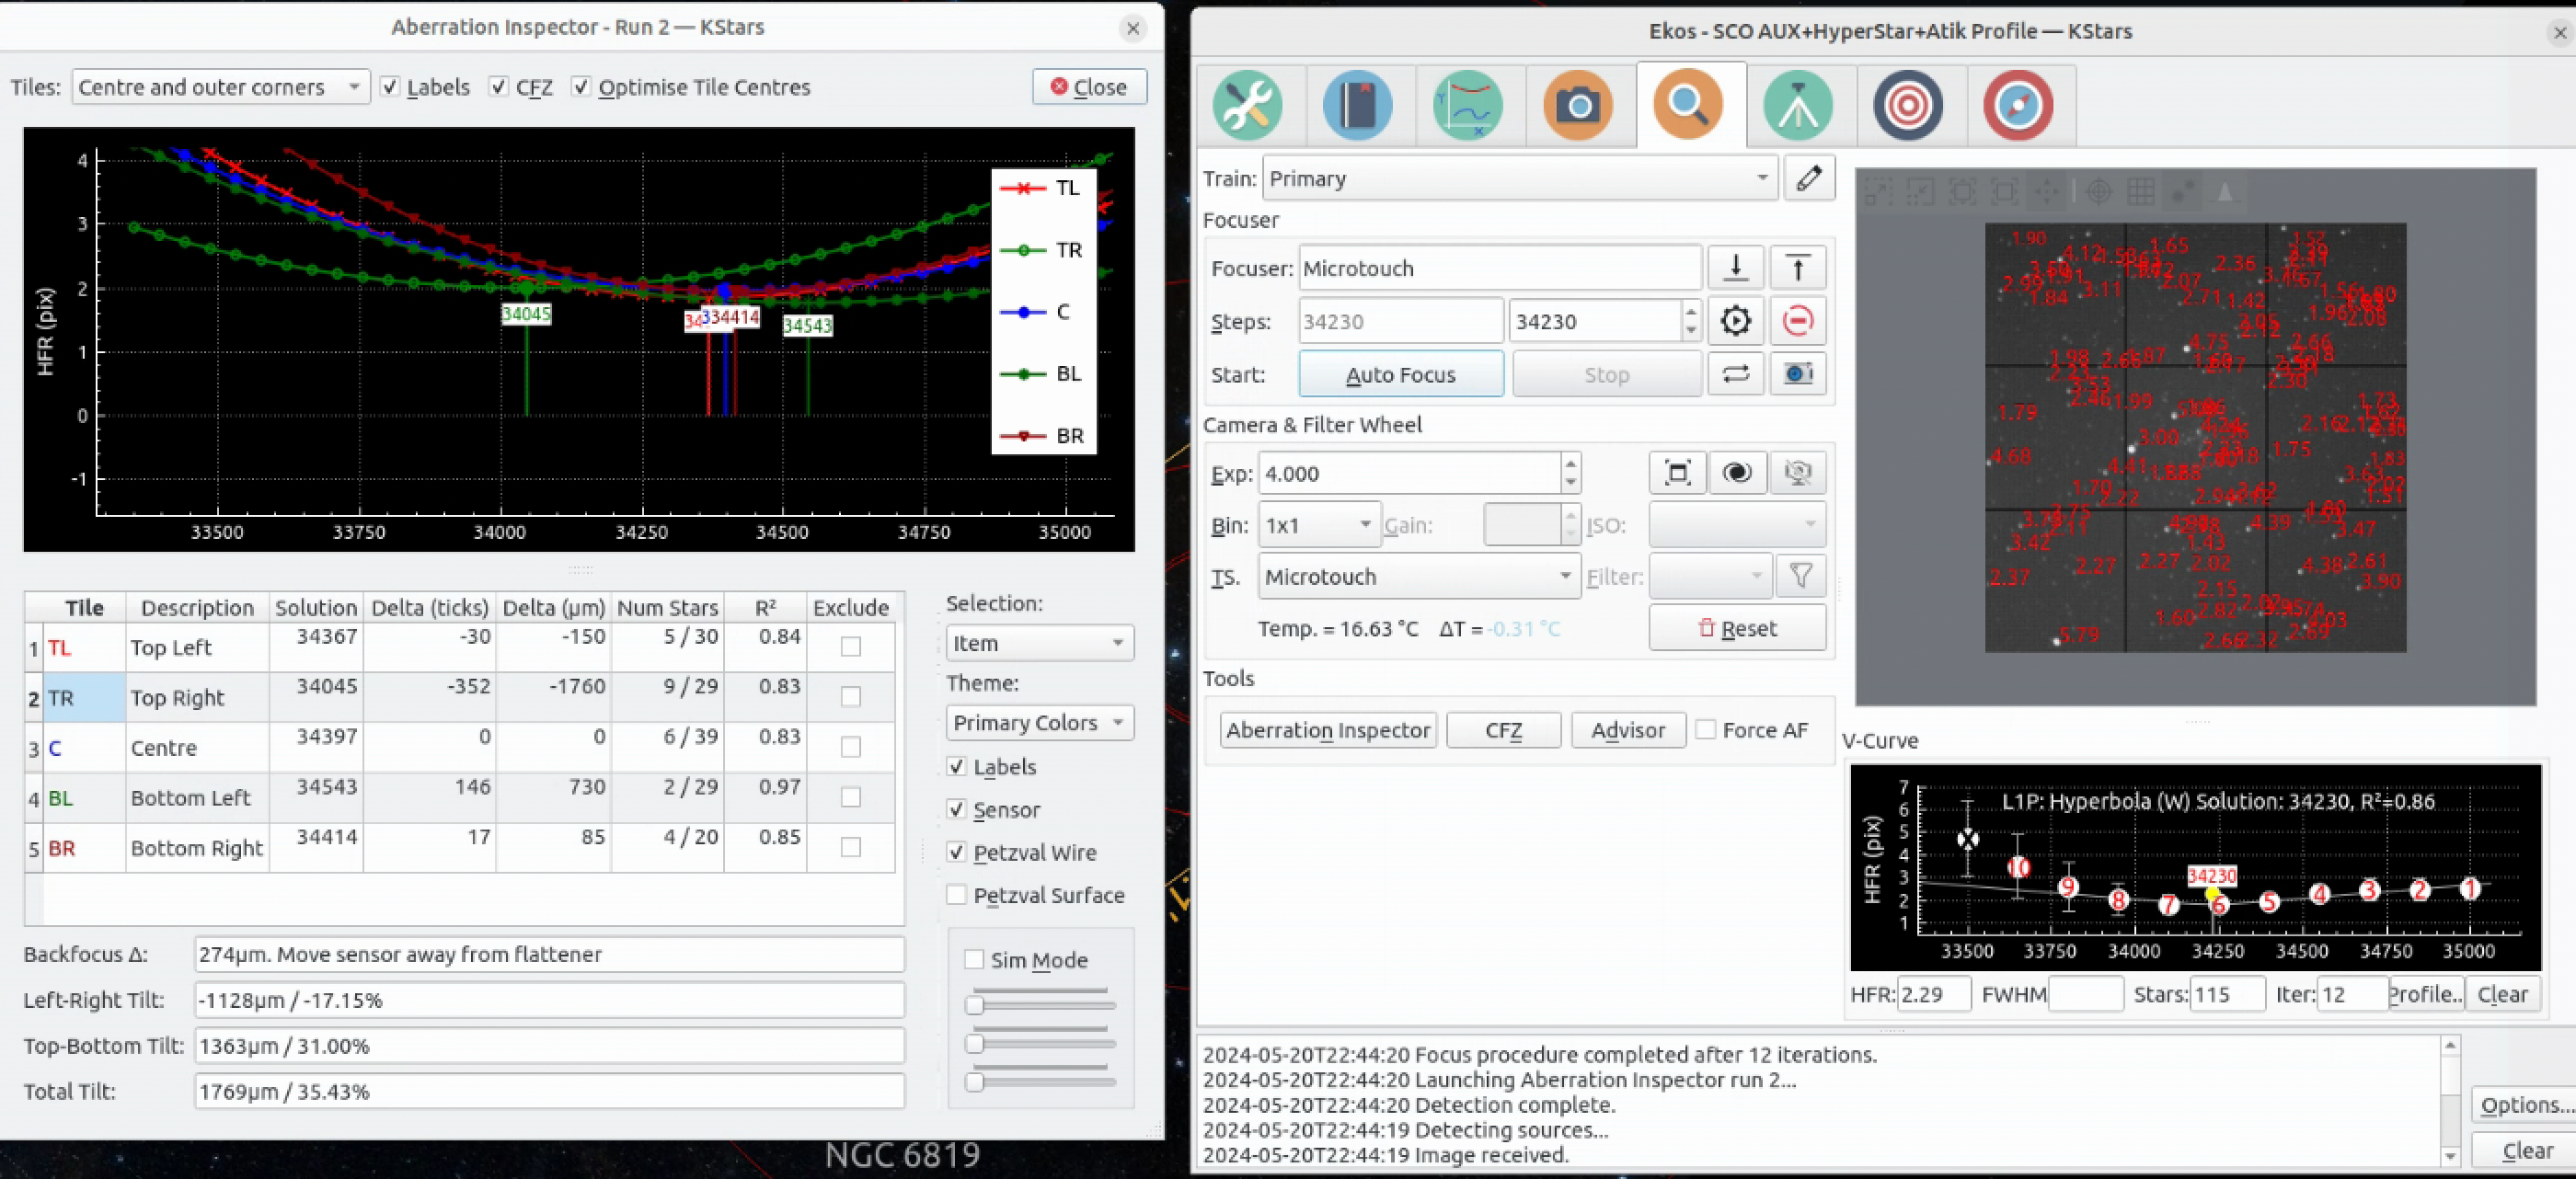
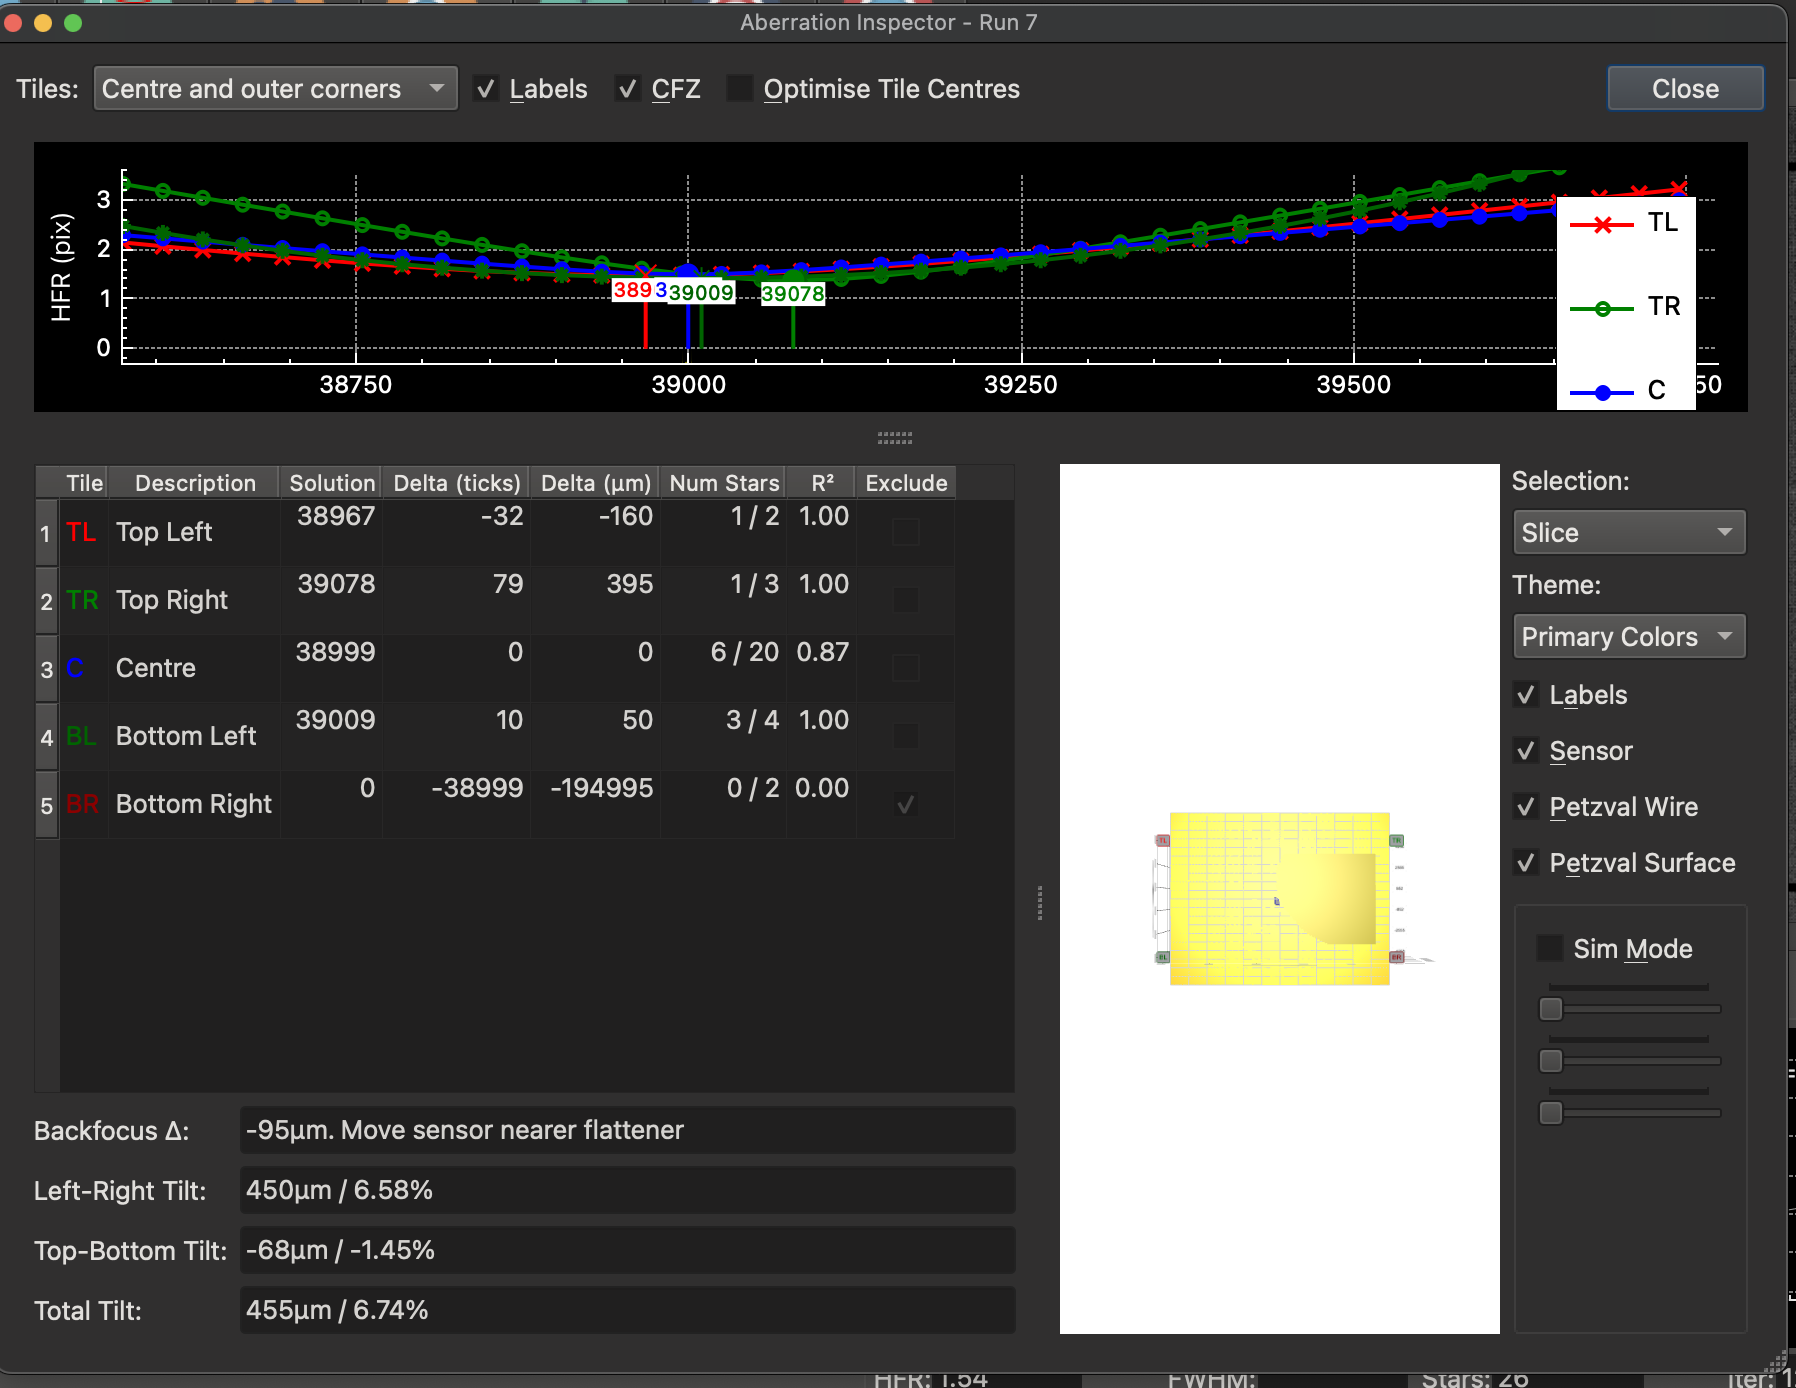
A more sophicated approach is to use the KStars Aberration Inspector Tool.
Finish configuring KStars on the RPi4, e.g. focus Starting Position and step size.
✔️ Set the precise location for SCO in the Hand Controller, rather than Halifax. St. Croix Observatory. 44 56 53.00. -64 02 27.00. 90.00 m
✔️ Check that the RPi4 is using a static IP address 1192.168.0.150
✔️ Measure the power consumption of the TP-Link Travel router. It's 2 W when measured without load.
✔️ Are we using the Donut buster focus option?
✔️ Install real-time clock so we don't have to rely on the mount for the date/time.
✔️ Create default flats and darks and bad pixel map for the Atik 428ex.
✔️ Create 360 image for placed tripod for visualizing the night sky horizon.
✔️Create exclusion polygon for limiting scope targets as they reach the trees.
✔️ Confirm a mechanism to copy images back to the user while using noVNC.
Create a video tutorial describing how to use the system.
Describe how to create stacked images during processing for Electronically Assisted Astronomy.
✔️ Create backup microSD of the "finished" microSD card to allow for failure.
Investigate AstraLite for live Stacking. https://indilib.org/kunena/clients/13006-astralite-simple-indi-client-for-astrophotography-and-livestacking.html?start=0
Investigate Siril integration with KStars https://indilib.org/kunena/ekos/14648-using-post-capture-sequence-scripts-for-eaa-live-stacking.html
Question for the board? Should the TPLink router be unplugged when not in use?
Reference Manuals
Celestron C8 Manual
Celestron Edge HD Instruction Manual.pdf
Hyperstar 4 on a Celestron C8 Manual
HyperStar_4_C8_GEM_Instructions.pdf
Atik 428ex Manual
https://atikcameras.wpenginepowered.com/wp-content/uploads/2015/07/AtikSeries4Manual.pdf